
STAGE 2 -The Roof
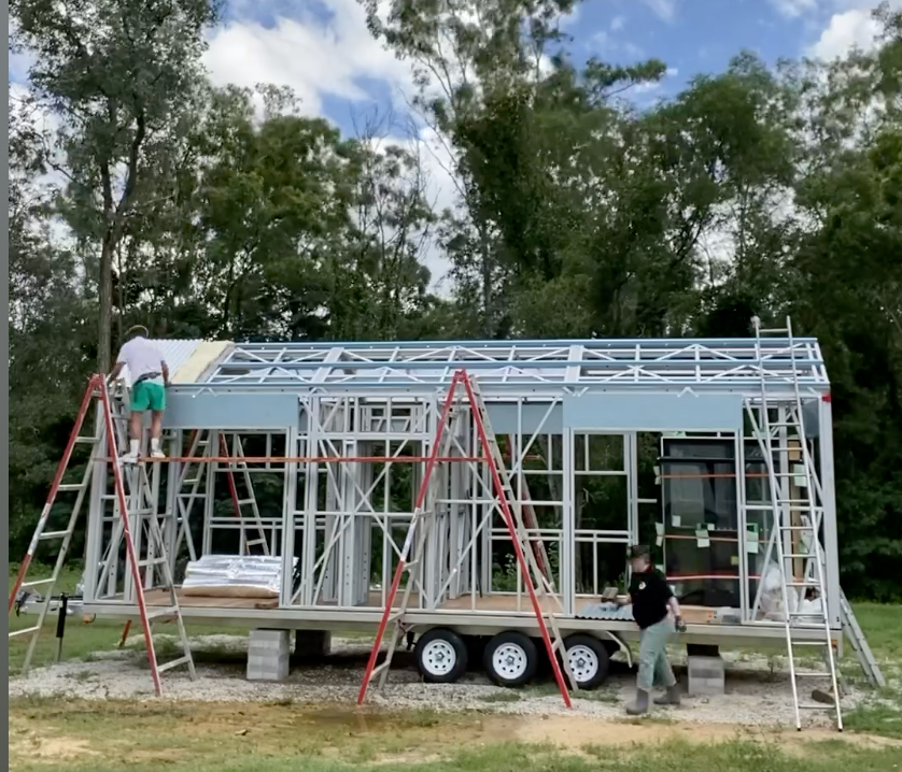
Embarking on the journey to construct the roof of my tiny house introduced an exhilarating yet daunting chapter in my construction saga. Given my engineering background, the meticulous planning and execution needed for the roofing phase were aspects I relished, albeit not without a dose of healthy trepidation. The process from setting the battens in place to achieving a waterproof, and aesthetically pleasing roof that could shield me from the elements of South East Queensland required patience, precision, and a bit of ingenuity—qualities I was ready to leverage to their fullest.
Step 1: Preparation and Planning
The journey began long before any materials were physically handled. Meticulous planning was paramount. I poured over roofing methodologies, materials, and designs. This endeavour wasn’t just about shelter; it was about creating a sustainable, durable, and visually appealing crown for my tiny abode. Selection of materials played a critical role—choosing lightweight yet sturdy options that could withstand the harsh elements while supporting my vision of a tiny eco-haven.
Step 2: Erecting the Battens
Positioning the battens was the first tangible step towards shaping my house’s skyline. Battens, or horizontal beams, serve as the foundation upon which the roof is built, offering support for layers to come. Each batten had to be precisely measured, cut, and secured to ensure an even, stable base for the roofing materials. This initial step was a delicate balancing act—aligning each batten perfectly to avoid future water leaks or uneven weight distribution. My hands, guided by my engineering insight, moved with care, ensuring every fastening was secure, every measurement exact.
Step 3: Laying the Roofing Sheets
With the battens in place, the next layer to tackle was the roofing sheets. This stage introduced a visual transformation, turning abstract plans into a sheltering structure. Handling these sheets required a combination of strength and finesse—positioning each panel correctly before securing it firmly to the battens. The rhythmic sound of the drill became the soundtrack of progress as I affixed each sheet, witnessing the roof unfold piece by piece. This layer not only provided an additional level of shelter but also began to reveal the tiny house’s evolving silhouette against the sky.


Why am I sharing my story?
I’m a single, childless, relatively well paid academic but yet I am still finding myself caught up in this housing crisis. I, like many of you, have been through the whole rental process of going and seeing places that have extortionate rents attached to them and being wholly disappointed with the state of the place. This is not an uncommon situation and we’re seeing more and more of these stories popping up in our newsfeeds. It’s a shocking state of affairs, and those most caught up in this situation are women. Whether they are like me and on their own, whether they are trying to leave a situation that they no longer want to be in and don’t have the financial backing to live independently, or whether they have a family and they all want to downsize and start living tiny to lead a more sustainable lifestyle.
This is a significant challenge. I’m building a house at the end of the day, regardless of how tiny it is, it still has all the main components of a standard home. There is A LOT of decision making required, a lot of personal challenges like coming to terms with my level of (in)flexibility. Nevertheless, I am documenting the entire process to share both the ups and the downs, and to help others appreciate how easy it can be at times, and how difficult it can be at other times.