
STAGE 3 -The Exterior
This is 99% complete!
I was truly amazed at how the next stage made her look so much bigger! The action of closing in the frame had a massive effect on the look and feel of my evolving home.
This stage of the development had lots of stops and starts due to rain but I finally got all the doors and windows in AND the thermal/waterproof wrap after a short weather delay that felt a lot longer than it was!
This was the point that I started to go from feeling like the delay was never-ending to feeling like it had all gone so fast!!

Step 1: Thermal Wrap and Insulation
The heart of the home lies in its ability to maintain a comfortable internal environment. For my tiny house, this started with the thermal wrap, eventually to be tucked behind the external cladding. A very quick and simple looking process rapidly defined the outline of the home. This step was a dance, balancing between efficiency and thoroughness to ensure no gaps or spaces would compromise the house’s warmth (and cooling in the summer months!). The tangible sense of my tiny house becoming a home grew stronger, layer by layer.

Step 2: Flashings and Steel Sheeting
Following the thermal wrap, steel and sheeting was added to seal the interior from the elements. This stage was incredibly rewarding as it began to give the tiny house a more defined space. The process was methodical, each panel bringing me one step closer to the vision of my completed home. This wasn’t just construction; it was an act of creation—transforming raw materials into a liveable, breathable space.

Step 3: Timber Cladding & Finishing Touches
With the majority of the frame enclosed, it was time for the final touches. The choice of timber material had to offer additional protection and had to align with the tiny house’s aesthetic.
Standing back to admire the completed exterior was an indescribable feeling. It was more than just a structure; it was a symbol of resilience, a shelter that I built with my own two hands and a lot of help thus far from the expert tradespeople that were along for the ride too.
Then the first set of cladding sheets finally went on! Half the front and all of the back initially. I was amazed at just how slick she looked!! I loved it!!
This was the stage where I couldn’t quite believe how quickly it was all coming together. My brain was fried at this point. I was awash with measurements and costs and schedules, it was just like the good old days when I was a site Quantity Surveyor. There is of course something very different about a project when it’s your own money though!
The steel cladding was fairly straightforward with some more detailed cutting around the windows and doors but I was so happy with the results.
It took me longer than anticipated to get the timber panels prepped and ready for installation. Despite the additional time, labour, and resulting costs involved in this distinctive design element, I felt it really gave my home the special and unique feel I was looking for.

Being back on track with the final phase of the cladding was a huge relief. The feedback I was getting at this point about the project was phenomenal. To be perfectly honest it was the main thing that was keeping me going on those difficult days.
Beneath a sky generous with light, today marked a milestone etched with the whir of a circular saw and the scent of freshly cut timber—my Weathertex boards have taken form! From the borrowed tools, a circular saw pulsing with potential and an extension lead unspooling like a promise, my hands guided by camaraderie and craft, sliced cleanly through the boards.
With each measured cut, a sense of accomplishment swelled within me. These boards lay in the wake of my toil, each one a step closer to cladding the final walls of my tiny house, giving them the fine frame they deserve. The transformation from raw planks to precise weatherboards ready to be primed and installed heralds the kind of joy only a builder’s spirit can know.
The jubilation is palpable, captured aptly in the final photograph—my face a canvas of pride and satisfaction. It is also a refreshing breath of visual change; the ubiquitous blue sarking paper that has been a constant backdrop in my updates is now replaced by the tangible progress of my labour. The vision of my tiny house is inching ever closer to reality, one board, one cut, one joyful snapshot at a time.
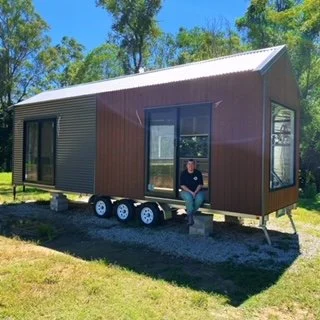
And The Exterior is 99% Complete!
Finally!!! It’s taken much longer than anticipated to get those timber panels installed. Much more complex, time consuming, labour intensive (and costly!) than I’d hoped for but I’m SO HAPPY with the result! The only thing left to do outside now is to fix the gutters and complete the flashings, which will not only seal the exterior from the elements, but also frame those doors and windows!


Why am I sharing my story?
I’m a single, childless, relatively well paid academic but yet I am still finding myself caught up in this housing crisis. I, like many of you, have been through the whole rental process of going and seeing places that have extortionate rents attached to them and being wholly disappointed with the state of the place. This is not an uncommon situation and we’re seeing more and more of these stories popping up in our newsfeeds. It’s a shocking state of affairs, and those most caught up in this situation are women. Whether they are like me and on their own, whether they are trying to leave a situation that they no longer want to be in and don’t have the financial backing to live independently, or whether they have a family and they all want to downsize and start living tiny to lead a more sustainable lifestyle.
This is a significant challenge. I’m building a house at the end of the day, regardless of how tiny it is, it still has all the main components of a standard home. There is A LOT of decision making required, a lot of personal challenges like coming to terms with my level of (in)flexibility. Nevertheless, I am documenting the entire process to share both the ups and the downs, and to help others appreciate how easy it can be at times, and how difficult it can be at other times.